Photoshop Curves Tutorial to Improve Your Photo Editing Skills
Here is a Photoshop curves tutorial that will greatly help you improve your skills in photo editing. For someone who has just started using Photoshop, the Curves is possibly one of the most intimidating tools for them. Using the Curves tool in Photoshop gives you more control in editing photographs such as the brightness, contrast, and tones. So if you are not using the Curves yet, then you are missing on a lot of things. Beginners usually try to correct tones, brightness, contrast and sharpness of a picture by playing around the Brightness and Contrast control or the Levels.
This Photoshop Curves tutorial will try to explain in simple terms and some illustrations the basic techniques for the powerful secrets of image correction using Curves. Getting familiar and mastering Adobe Photoshop Curves is the key to many advanced image correction techniques. In this Photoshop Curves tutorial, however, we will focus on the basic techniques and advantages of using this tool in editing images.
Step#1: Familiarizing with the Photoshop Curves Dialogue Box
Once you have an image open in Photoshop, go to Image>Adjustment>Curves to access the Curves dialogue box. By default, you will see a grid with a 45-degree line across the box. You will also see a gradient both at the side and the bottom of the grid. These gradients tell you which side of the Photoshop curves relate to black and which side relates to white.
Let’s look at the functions of the most crucial tools inside the Curves dialogue box.

1. Channel: Use this drop-down menu to select and adjust the curves for all the channels in a color mode (RGB or CMYK). You also have the option to select and adjust an individual channel (C, M, Y or K—if you’re working in CMYK mode; or R, G, or B).
2. Point Tool and Pencil Tool: The pencil tool allows you to draw curves on the grid while the point tool will automatically add points to the curve you drew. Specifically, the point tool also allows you to add or adjust points to a curve.
3. Curve Point: Use these points to adjust the curve. The default color of these points is white when unselected. When they are black, it means, these points are selected.
4. Eye droppers: The three eyedroppers pertains to shadow, mid tones and highlights. Use them to pick or identify the corresponding color tones in an image to help you in the image correction process.
5..Large/Small grids: Photoshop offers you two options for viewing the grids area. Toggle between the two views using these buttons.
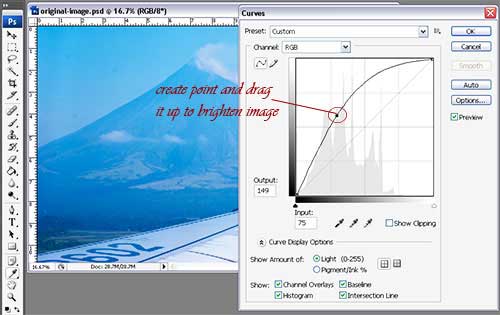
Step#2: How to brighten or darken an image in Photoshop using the Curves Dialogue Box
It is quite easy to adjust the tone of an image using this method in Photoshop. The simple rule that we need to remember is that if any point of the curve is steeper than 45 degrees, you are adding contrast. If the Photoshop curve is shallower than 45 degrees, then contrast is removed. Thus the simplest way to brighten an image in Photoshop using Curves is to create a point in the middle and drag it up. Since you only have one point, dragging it up will change the 45-degree line into a curved line.
Step#3: How to add contrast to an image in Photoshop using Curves
To understand the effect of the “S” curve in the overall brightness and contrast of the image in Photoshop, we need to have a good understanding of the principle that a picture has high contrast if a section of the curve is steeper than 45 degrees and if shallower, contrast is down. So what the “S” curve does is quite self-explanatory and is too quite obvious and logical.
The two points in the “S” curve force the section close to black and white to be shallower than 45 degrees, thus reducing contrast. At the same time, the gradient of the curve is steeper than 45 degrees over the midtones, increasing their contrast.
Photoshop Curves Tutorial Step#3: Using curves eyedropper in Photoshop
There are three eyedroppers that you can use in the Photoshop Curves options as shown in the image below.

1. Shadow Eyedropper: Use this to add saturation to an image. Once selected, click on any black area on the image you are working on in Photoshop. If your image is initially too bright, you can use this tool to gain better saturation.
2. Midtone Eyedropper: Once selected, click any middle tone area of the image. This tool can change the entire color tone of an image, so experiment or try as many colors as possible as your mid-tone before you hit the OK button in Photoshop.
3. Highlight Eyedropper: Use this to brighten up an image. Simply select it on the curves dialogue box and click on the white area of an image. This is very useful if you are working on an image with low saturation.
I hope you enjoy this tutorial. For more Photoshop tutorials, visit our Photoshop Tutorials page.