How Professionals Sharpen Images in Photoshop
There are a hundred ways to improve your photos using Photoshop photo editing. In addition to color correction, the other important aspect of photo editing that you should be looking at is how to sharpen an image. Photoshop offers you an extraordinary degree of control over the sharpness of your image. One built-in option is to use the Unsharp Mask filter, which has been present even in the older versions of Photoshop.
With the introduction of Photoshop CS2, however, Smart Sharpen filter which gives better results and greater control over the Unsharp Mask filter becomes a favorite of most users, especially photographers, to sharpen images. I will not teach you how to perform these two options for sharpening images in Photoshop because they are already readily available and can be used with just a few clicks. Instead, I will discuss how professional photographers sharpen their photos without the help of any third-party plugin in Photoshop.
Interested? Then read this quick tutorial on how to use the so-called LAB Color in Photoshop. LAB, by the way, stands for Lightness and Color Channel A and B.
HOW TO SHARPEN IMAGE IN PHOTOSHOP
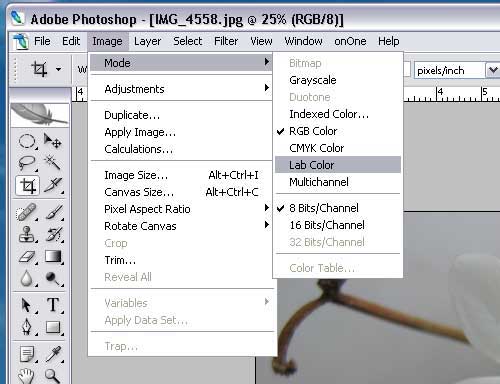
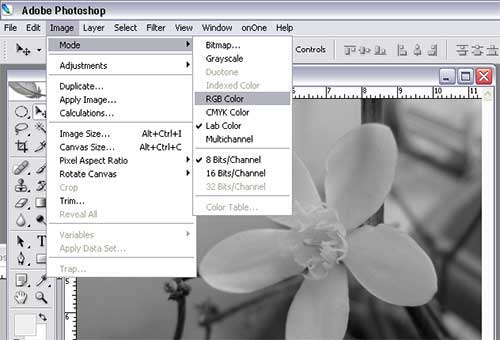
Sharpen Image in Photoshop-First Step: Convert your photograph from RGB or CMYK to Lab.
Open your image and select Image>LAB Color. Unlike when converting your photos from RGB to CMYK, converting to LAB does not affect the image color.
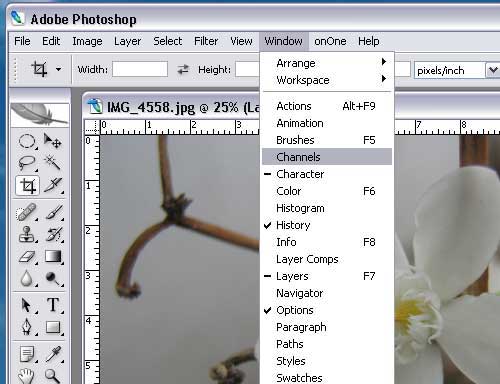
Sharpen Image in Photoshop-Second Step: Open the channel palette.
Click Window>Channels.
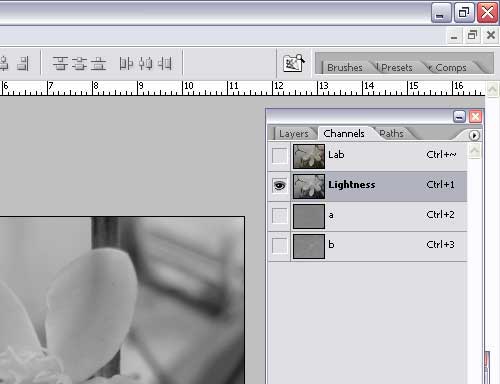
Sharpen Image in Photoshop: Choose the channel
There are three channels: L stands for lightness which is what you get when you convert to grayscale; A is Red to Green, B is Blue to Yellow. In the Channels palette, highlight the Lightness to isolate that channel.
Sharpen Image in Photoshop-Fourth Step: Apply Filter
In the Filter menu, click Sharpen>Unsharp Mask and move the sliders to get a nice balance of sharpness before the halo becomes overwhelming. Click OK.
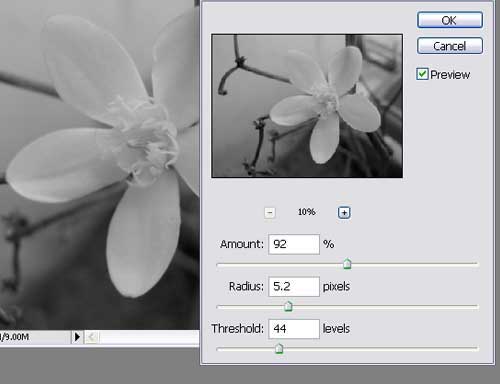
TIP: To sharpen the image without a problem, you should watch out for the halo effect that will appear along a hard edge of a line or curve. This is due to how sharpening is applied by contrasting the colors along these edges. Thus you should stop where the halo effect becomes too obvious. That is the optimum sharpening amount you need for your image because the halo is what makes the image stand out.
Sharpen Image in Photoshop-Fifth Step: Convert the image back to RGB.
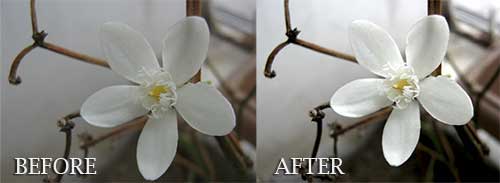
Now you have an image that is sharp with no halo.
Let’s compare the “before” photo with the “after” photo:

If you want to try out other techniques. then check out our earlier post featuring 10 useful techniques for sharpening images in Photoshop.